因为当前政策的收紧,很多docker镜像网站和加速器都不能使用了,虽然目前还有一些可以使用,但是打游击战终究是不可靠的,在可以预见的将来肯定会更加难以下载docker镜像,而我也厌烦了各种docker pull失败,所以这里直接使用clash设置代理,翻入墙外来彻底解决这个问题。
安装配置Clash
1. 下载Clash
- 由于原Clash已经删库跑路,所以可以使用镜像地址下载linux版本的clash。
2. 配置并运行clash

配置文件的内容大致如下,port、socks-port是相关流量转发的接口,external-controller是控制平面的接口,可以酌情修改,proxies下面的内容就是机场提供的接口了。
1
2
3
4
5
6
7
8
9
10
11
12
13
14
15
16
| port: 7890
socks-port: 7891
allow-lan: false
mode: rule
log-level: info
external-controller: '0.0.0.0:9999'
experimental:
ignore-resolve-fail: true
dns:
enable: true
ipv6: false
enhanced-mode: fake-ip
nameserver: [1.2.4.8, 223.5.5.5]
fallback: [1.2.4.8, 223.5.5.5]
proxies:
-...
|
1
2
3
4
5
6
7
8
9
10
11
12
13
14
15
16
17
18
19
20
21
22
23
24
25
26
27
28
29
30
31
32
33
34
35
36
37
38
39
40
41
| [root@localhost ~]
[root@localhost ~]
[root@localhost ~]
[root@localhost ~]
[root@localhost ~]
[root@localhost clash]
--2021-05-01 22:39:37-- [订阅链接]
Resolving www.sub-speeder.com (www.sub-speeder.com)... 104.21.18.176, 172.67.182.209, 2606:4700:3035::ac43:b6d1, ...
Connecting to www.sub-speeder.com (www.sub-speeder.com)|104.21.18.176|:443... connected.
HTTP request sent, awaiting response... 200 OK
Length: 44830 (44K) [application/octet-stream]
Saving to: ‘config.yaml’
100%[======================================>] 44,830 287KB/s in 0.2s
2021-05-01 22:39:38 (287 KB/s) - ‘config.yaml’ saved [44830/44830]
[root@localhost clash]
--2021-05-01 22:39:55-- <https://www.sub-speeder.com/client-download/Country.mmdb>
Resolving www.sub-speeder.com (www.sub-speeder.com)... 172.67.182.209, 104.21.18.176, 2606:4700:3035::ac43:b6d1, ...
Connecting to www.sub-speeder.com (www.sub-speeder.com)|172.67.182.209|:443... connected.
HTTP request sent, awaiting response... 200 OK
Length: 3878104 (3.7M) [application/octet-stream]
Saving to: ‘Country.mmdb’
100%[======================================>] 3,878,104 2.86MB/s in 1.3s
2021-05-01 22:39:58 (2.86 MB/s) - ‘Country.mmdb’ saved [3878104/3878104]
[root@localhost clash]
[root@localhost clash]
total 19832
-r-x--x--x. 1 root root 9326592 May 1 23:24 clash
-rw-r--r--. 1 root root 44830 May 1 22:39 config.yaml
-rw-r--r--. 1 root root 3878104 Oct 9 2020 Country.mmdb
[root@localhost clash]
INFO[0000] Start initial compatible provider Proxy
INFO[0000] Start initial compatible provider Domestic
INFO[0000] Start initial compatible provider AsianTV
INFO[0000] Start initial compatible provider Others
INFO[0000] Start initial compatible provider GlobalTV
|
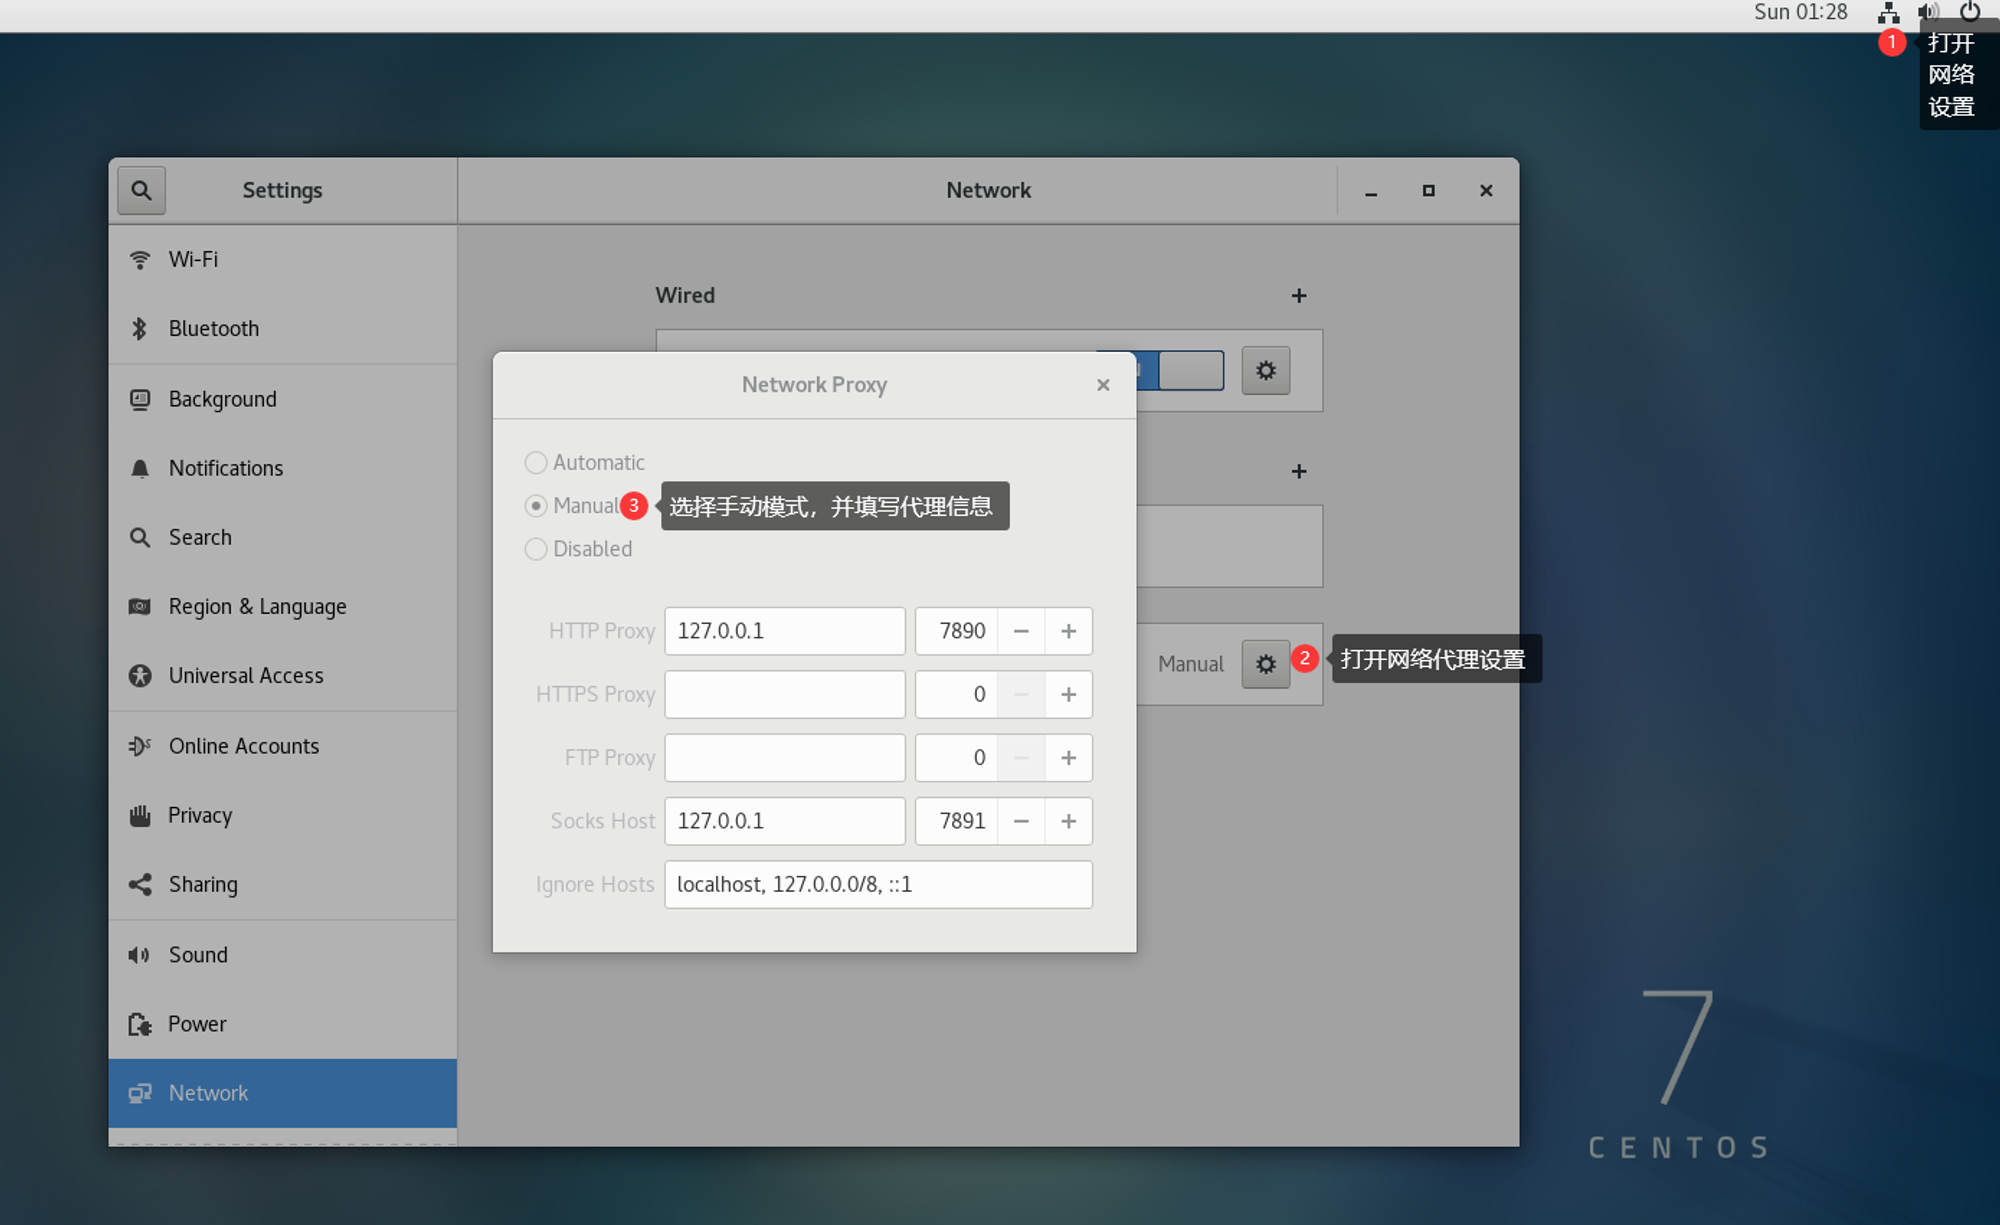
3. 启用系统代理
打开系统设置,点击网络代理右边的 ⚙ 按钮,选择手动,填写 HTTP 和 HTTPS 代理为 127.0.0.1:7890,填写 Socks 主机为 127.0.0.1:7891,即可启用系统代理,如下图所示。
4. 测试验证
1
2
| [root@localhost ~]
<!doctype html><html itemscope="" itemtype="http://schema.org/WebPage" lang="en"><head><meta content="Search the world's information, including webpages, images, videos and more. Google has many special features to help you find exactly what you're looking for." name="description"><meta content="noodp, " name="robots"><meta content="text/html;...
|
- 还可以通过访问https://clash.razord.top/#/connections来用浏览器对clash进行管理,进入网站时需要输入clash所在的服务器的地址和上述提到的
external-controller的端口。注意只有将配置文件config.yaml中的external-controller的地址设置成了0.0.0.0才能够通过其他电脑访问服务器所在的clash服务。
5. 配置开机自启动
5.1 配置Clash服务
1. 创建service文件
touch /etc/systemd/system/clash.service
2. 编辑service文件
打开service文件
vi /etc/systemd/system/clash.service
填入以下内容**(注意修改clash文件夹路径)**
1
2
3
4
5
6
7
8
9
10
11
| [Unit]
Description=clash daemon
[Service]
Type=simple
User=root
ExecStart=/opt/clash/clash -d /opt/clash/
Restart=on-failure
[Install]
WantedBy=multi-user.target
|
保存并退出
3. 启动Clash
systemctl start clash.service
4. 设置Clash开机自启动
systemctl enable clash.service
以下为Clash相关的管理命令
systemctl start clash.service
systemctl restart clash.service
systemctl status clash.service
5.2 配置自动启动代理接口
1
2
3
4
5
6
7
8
9
10
11
12
13
14
15
16
17
18
19
20
21
22
23
24
|
proxy() {
case "$1" in
on)
export https_proxy=http://127.0.0.1:7890
export http_proxy=http://127.0.0.1:7890
export all_proxy=socks5://127.0.0.1:7891
echo "Proxy is set to http://127.0.0.1:7890 and socks5://127.0.0.1:7891"
;;
off)
unset http_proxy
unset https_proxy
unset all_proxy
echo "Proxy settings are unset"
;;
*)
echo "Usage: proxy {on|off}"
return 1
;;
esac
}
proxy on
|
然后执行 source ~/.bashrc 重新加载脚本,这时候会提示已经设置了代理了,后续再新建bash的时候也会进行提醒,这里默认是新建bash的时候都会设置代理,如果不需要可以注释掉proxy on 那一行。后续使用的时候可以使用proxy off关闭代理,使用proxy on开启代理。
6、配置定时更新订阅
- Clash For Linux 到目前为止没有自动订阅方式,我们做一个计划任务实现更新
config.yaml
- 用Cron执行计划任务
1
2
3
4
5
| 29 6 * * * root pgrep clash | xargs kill -s 9
30 6 * * * root mv /opt/clash/config.yaml /opt/clash/configbackup.yaml
31 6 * * * root wget -P /opt/clash/ -O config.yaml [你的订阅链接]
32 6 * * * root nohup /opt/clash/clash -d /opt/clash/
|
- 按Esc和:wq保存退出
- 重启crontab,使配置生效
配置docker使用Clash
上述设置的代理其实是给shell用的,Docker 守护进程没有使用 shell 中设置的代理环境变量,要让docker在pull镜像时也使用就需要在 Docker 的配置文件中显式指定代理设置。
1. 创建或编辑 Docker 的系统服务配置文件
1
2
| sudo mkdir -p /etc/systemd/system/docker.service.d
sudo nano /etc/systemd/system/docker.service.d/http-proxy.conf
|
2. 在 http-proxy.conf 文件中添加以下内容:
1
2
3
4
| [Service]
Environment="HTTP_PROXY=http://127.0.0.1:7890"
Environment="HTTPS_PROXY=http://127.0.0.1:7890"
Environment="NO_PROXY=localhost,127.0.0.1"
|
如果你需要指定更多不需要代理的地址,可以将它们添加到 NO_PROXY 列表中,用逗号分隔。
3. 重新加载系统守护进程并重启 Docker
1
2
| sudo systemctl daemon-reload
sudo systemctl restart docker
|
验证 Docker 代理设置
- 查看 Docker 的环境变量是否已经生效:
1
| sudo systemctl show --property=Environment docker
|
- 尝试拉取一些原本拉取不了的镜像:
1
| docker pull registry.k8s.io/etcd:3.5.11-0
|
参考资料
- https://github.com/ghostxu97/clash-for-linux
- https://blog.iswiftai.com/posts/clash-linux/